How pc can be connected in trunk port of managable switch:
How to connect a PC/ Laptop to a trunk port of a Managable switch?
Generally, in a PC RJ 45 cable can be connected to access port in a manageable switch.
In some NIC cards, there is option for using PC/laptop connected to trunk port of a switch.
The steps to connect trunk port to PC
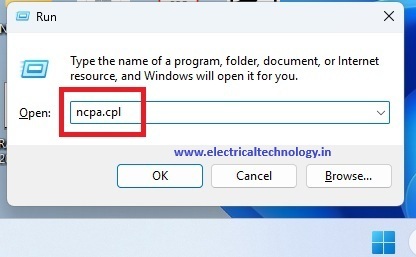
Step1: take ethernet settings use the command ncpa,cpl in Windows+R
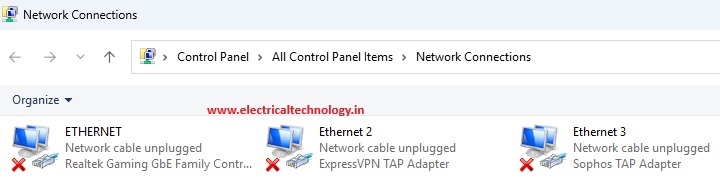
Right click on your connected Ethernet take properties
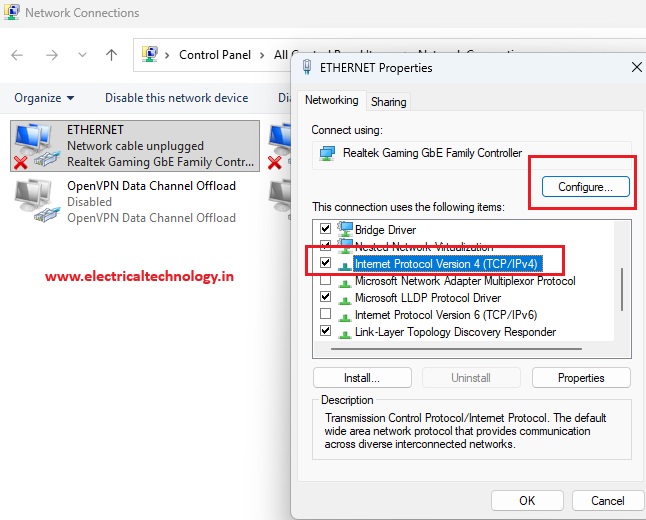
Take advanced settings in IPV4 properties configure option.
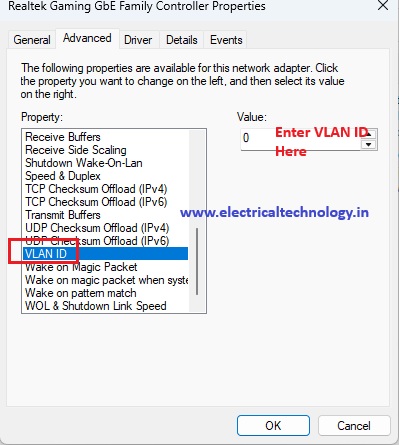
Take VLAN ID option. Enter the particular vlan number, which is to be connected from that trunk port.
Then the Laptop/PC will be getting automatic IP in that VLAN if dhcp enabled, or you can add a static IP for that PC.
By default, a trunk port expects traffic to have VLAN tags (IEEE 802.1Q), whereas a standard PC network card (NIC) sends and receives untagged traffic.
If you just plug a PC into a trunk port without any extra configuration, one of two things will happen:
- It will only talk to the Native VLAN: The PC will automatically fall into whatever VLAN is configured as “native” on that trunk port (usually VLAN 1 by default), because trunk ports drop untagged traffic into the native VLAN.
- It will have no connectivity: If the native VLAN doesn’t match your network setup or is disabled, the PC won’t get an IP address.
To make a PC fully work on a trunk port—either to access a specific VLAN or multiple VLANs (for packet sniffing, virtualization, etc.
we can try two main approaches:
change port in Switch or change PC VLAN ID
Method 1: Use the Native VLAN (Simplest Method)
If you just want the PC to get internet/network access from a single VLAN without changing any settings on the PC, you configure the switch’s trunk port to use that specific VLAN as its Native VLAN.
- How it works: The switch will treat all untagged traffic coming from the PC as part of the Native VLAN. When sending traffic back to the PC, the switch will strip the VLAN tag off.
- Switch Configuration Example (Cisco CLI):
interface GigabitEthernet0/1
switchport mode trunk
switchport trunk native vlan 10  <-- The PC will now be in VLAN 10
Method 2: Configure VLAN Tagging on the PC (Advanced Method)
If your goal is to let the PC communicate with multiple VLANs simultaneously (for example, if you are running hypervisors like VMware Workstation, VirtualBox, or using Wireshark to monitor traffic), you must configure the PC’s network adapter to understand VLAN tags.
For Windows:
Standard Windows desktop drivers often hide VLAN settings, but advanced drivers (like Intel PROSet or Realtek Advanced Diagnostic Utility) allow it.
- Press
Win + Xand select Device Manager. - Expand Network adapters and double-click your network card.
- Go to the Advanced tab.
- Look for properties like VLAN ID, Packet Priority & VLAN, or Virtual LAN.
- Enable it and enter the specific VLAN ID you want the PC to use. (Note: To access multiple VLANs in Windows, you usually need to install the manufacturer’s specialized software utility to create multiple “Virtual NICs”, one for each VLAN).
For Linux:
Linux handles VLAN tagging natively and very easily. You can create a sub-interface for a specific VLAN.
- Open the terminal and create a VLAN interface (e.g., VLAN 20 on interface
eth0):
sudo ip link add link eth0 name eth0.20 type vlan id 20
2. Bring the new interface up:
sudo ip link set dev eth0.20 up
3. Assign an IP or request one via DHCP:
sudo dhclient eth0.20
Latest Posts
- Yes! The PC can work in Trunk port of a Managable switchHow pc can be connected in trunk port of managable switch: How to connect a PC/ Laptop to a trunk port of a Managable switch? Generally, in a PC RJ …
Read moreYes! The PC can work in Trunk port of a Managable switch
- Teamlink 721 Switch CLI configuration commands and Shortcut KeysTeamlink 721 Switch CLI configuration commands and Shortcut Keys: The Command Line Interface (CLI) is a medium for you to communicate with the TEAMLINK 721A. You can configure, monitor, and …
Read moreTeamlink 721 Switch CLI configuration commands and Shortcut Keys
- Airpro AP 4500 SNMP configuration|Airpro 4500 web GUI configAirpro AP 4500 SNMP configuration: Airpro 4500 configuration for snmp settings is shown in web GUI config mode. SNMP(Simple Network Management Protocol) SNMP: an application-layer standard protocol used for monitoring …
Read moreAirpro AP 4500 SNMP configuration|Airpro 4500 web GUI config
- SMPS Power plant for Telecom InstallationsSMPS Power plant for Telecom Installations: Power supply system is the heart of telecom systems & electronic equipments. For a reliable installation of telecom assets, reliable power supply system is …
- Commands for troubleshooting SFP optical levels OTDR testCommands for troubleshooting SFP optical levels OTDR test:To troubleshoot a link flapping port that has been err-disabled, use these diagnostic tools to isolate whether the fault lies in the fiber optics or …
Read moreCommands for troubleshooting SFP optical levels OTDR test
- [Solved]link flap cisco switch port error disabledlink flap cisco switch port error disabled: A Cisco switch port enters err-disabled state due to link flapping when the interface toggles up/down rapidly (typically 3+ times within 10 seconds), …
- [Solved]Sibling Issue in Cisco SwitchSibling Issue in Cisco Switch: Based on Cisco documentation, the error message %SYS-4-CHUNKSIBLINGSEXCEED: Number of siblings in a chunk has gone above the threshold refers to a scenario where a …
- Native VLAN Mismatch Smart port enabled in Cisco switches CBS 350Native VLAN Mismatch Smart port enabled in Cisco switches CBS 350: Smartport is a Cisco feature that automatically applies a set of preconfigured commands (called macros) to a switch port …
Read moreNative VLAN Mismatch Smart port enabled in Cisco switches CBS 350
- [100% Working]password complexity disable cisco CBS 350password complexity disable cisco CBS 350: In newer firmware for the Cisco CBS350 (specifically version 3.2.0.84 and later), Cisco introduced “Mandatory Password Rules” that cannot be disabled via the Web …
Read more[100% Working]password complexity disable cisco CBS 350
- [Solved!]VPN not working on mobile dataVPN not working on mobile data: If your VPN works on Wi-Fi but fails on mobile data, it is usually due to carrier protocol restrictions or a mismatch between the …